

Using a cane correctly can make walking feel more stable and may reduce the effort required from a painful or weaker leg. But a cane only helps when it is adjusted to the right height and used with the proper technique.
A cane that is too high, too low, or held on the wrong side can make walking less comfortable and may actually make you less stable.
This guide explains how to adjust a cane, which hand to use, how to walk with it, and how to handle stairs, curbs, and uneven surfaces more safely.
Quick Answer: A cane is generally adjusted so the handle is near the crease of your wrist when you stand upright with your arm relaxed at your side. Your elbow should have a slight bend when you hold the handle. For many people, the cane is held in the hand opposite the weaker or more painful leg.
If you are having significant difficulty walking, frequent falls, or need to put substantial weight through the cane, a healthcare professional or physical therapist can help determine whether a cane is the right mobility aid for you.
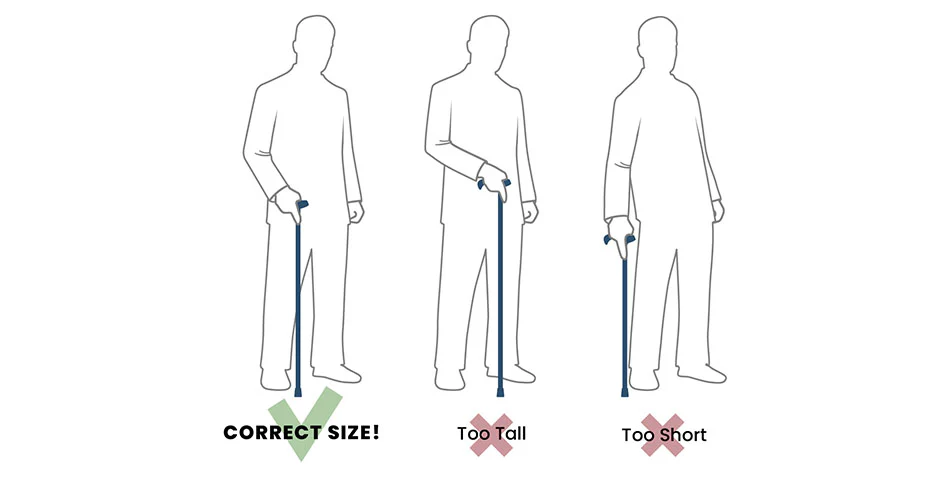
How to Adjust a Cane to the Right Height
Proper cane height is one of the most important parts of using a cane comfortably.
Stand upright on a firm, level surface while wearing the shoes you normally wear for walking.
Let your arms hang naturally at your sides.
The cane handle should generally line up with the crease of your wrist.
When you place your hand on the handle, your elbow should have a slight bend rather than being completely straight.
A Simple Cane Height Check
Use these steps to check the fit:
- Stand upright with your shoulders relaxed.
- Let the arm that will hold the cane hang naturally beside you.
- Position the cane next to your foot.
- Adjust the handle so it is approximately level with the crease of your wrist.
- Hold the handle without lifting or shrugging your shoulder.
- Check that your elbow remains slightly bent.
- Walk a few steps and reassess the fit.
The exact setting may vary somewhat depending on your body proportions, the type of cane, and how you use it.
If you have to lean noticeably to one side to reach the cane, it may not be adjusted correctly.
What Happens If a Cane Is Too High or Too Low?
A poorly adjusted cane can make walking more awkward.
If the cane is too high:
- Your shoulder may become elevated or tense.
- Your elbow may be too straight.
- It can be harder to put comfortable pressure through the handle.
If the cane is too low:
- You may have to bend or lean forward.
- Your posture can become less natural.
- The cane may feel less effective when you use it for support.
The goal is a comfortable, natural position rather than simply matching a particular measurement.
Which Hand Should Hold a Cane?
For many people, a cane is held on the opposite side of the weaker or more painful leg.
For example, if your right leg is painful or weaker, you would generally hold the cane in your left hand.
This allows the cane and affected leg to work together as you walk.
However, there are situations where the best position may be different. If you have pain, weakness, balance problems, or another condition affecting your arms or legs, individualized guidance from a physical therapist or other healthcare professional can be helpful.
Why Hold the Cane on the Opposite Side?
The opposite-side position can provide support while allowing the cane to work with the affected leg during the walking pattern.
Think of the cane as helping the weaker leg rather than simply being something you lean on.
Avoid automatically switching the cane to the painful side unless you have been specifically advised to do so.
How to Walk With a Cane
Once the cane is adjusted correctly, practice on a flat, uncluttered surface.
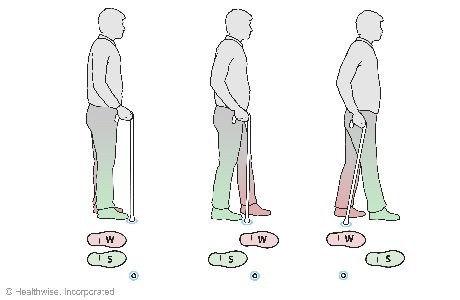
A basic walking pattern is:
- Hold the cane in the hand opposite the weaker or more painful leg.
- Move the cane forward a short distance.
- Move the weaker or painful leg forward toward the cane.
- Step through with the stronger leg.
- Repeat the sequence.
Take controlled steps rather than trying to move quickly.
The cane should remain close enough to your body that you do not have to reach far to place it.
Don’t Put the Cane Too Far Ahead
One common mistake is placing the cane well ahead of the body and then leaning forward to reach it.
Instead, keep the cane relatively close and move it forward only as far as you can comfortably and safely control.
Shorter, controlled movements are often easier to manage than taking large steps with the cane.
How Much Weight Should You Put on a Cane?
A cane is generally intended to provide support and improve stability, not necessarily to carry most of your body weight.
The amount of weight you should place through the cane depends on why you are using it and how much support you need.
If you find yourself heavily relying on the cane to keep yourself upright, or you cannot walk safely without putting substantial weight through it, a different mobility aid may be more appropriate.
A walker, for example, generally provides a broader base of support than a single-point cane.
How to Use a Cane on Stairs
Stairs require extra care because the cane provides only limited support compared with a handrail.
Whenever possible, use a secure handrail in addition to your cane.
A commonly taught sequence is:
Going up:
Strong leg first, then the weaker leg and cane.
Going down:
Cane and weaker leg first, then the stronger leg.
A simple way to remember the sequence is:
Up with the good. Down with the bad.
However, stair technique can vary depending on your mobility and the type of cane you are using.
Don’t Rush on Stairs
Take one step at a time if that is the safest approach for you.
Make sure the cane tip is securely positioned before putting weight through it.
Do not place the cane where it could slip off the edge of a step.
If you regularly have difficulty using stairs, especially if there is no handrail, ask a physical therapist or other qualified professional to demonstrate the safest technique for your situation.
Using a Cane on Curbs
Curbs can be more challenging than level ground because of the change in height.
Approach the curb slowly and make sure the cane tip is positioned securely.
When stepping up, lead with the stronger leg when appropriate.
When stepping down, the cane and weaker leg generally move first.
Avoid stepping onto or off a curb while simultaneously reaching the cane too far forward.
Using a Cane on Uneven Ground
Grass, gravel, cracked sidewalks, slopes, and other uneven surfaces require more attention.
Before taking a step:
- Look at the surface ahead.
- Place the cane securely.
- Take shorter steps.
- Avoid rushing.
- Keep your body upright as much as possible.
- Watch for loose gravel, wet surfaces, ice, and other hazards.
A standard cane may not provide enough stability for some people on particularly uneven surfaces.
If you regularly encounter difficult terrain, consider whether a cane is providing enough support for your needs.
Check the Cane Tip Regularly
The rubber tip at the bottom of a cane is an important part of its stability.
Inspect it periodically for:
- Excessive wear
- Cracks
- Missing pieces
- Loss of traction
- A loose fit
A worn or damaged tip should be replaced.
A cane that looks fine overall can still become less stable if the tip is badly worn.
Common Cane-Use Mistakes
Even a properly adjusted cane can be difficult to use effectively if the technique is incorrect.
Holding the Cane on the Wrong Side
For many people, the cane works best in the hand opposite the weaker or more painful leg.
Setting the Cane Too Far Away
Reaching too far can cause you to lean or twist your body.
Taking Steps That Are Too Large
Large steps can make it harder to maintain control, especially on uneven surfaces.
Looking Only at the Cane
Keep your attention on the walking surface ahead rather than staring down at the cane with every step.
Using a Damaged Cane Tip
A worn tip can reduce traction and stability.
Using a Cane When More Support Is Needed
A cane may not be enough if you have significant balance problems, frequent falls, or substantial difficulty supporting yourself while walking.
What Type of Cane Is Best for Arthritis?
There is no single cane that is best for everyone with arthritis.
The right choice depends on why you need the cane and where you expect to use it.
A standard single-point cane may be appropriate when you need relatively light support.
A quad or freestanding cane can provide a broader base and may be useful for someone who has difficulty balancing or frequently needs to set the cane down.
A folding cane can be convenient for travel and occasional use.
A specialized stair cane may be useful for people who have particular difficulty navigating stairs.
For a comparison of different cane types and specific examples, see our guide:
Best Walking Canes for Arthritis: Stability, Comfort & Support
Cane or Walker: Which Is Better?
A cane is generally less bulky and easier to maneuver than a walker, but it provides less support.
A cane may be suitable when you need some additional stability but can otherwise walk independently.
A walker may be more appropriate when you need a wider base of support or have significant balance or walking difficulties.
If you are unsure which mobility aid is appropriate, a physical therapist can assess your walking and recommend the level of support that best fits your needs.
When to Get Help With Cane Use
Consider asking a healthcare professional or physical therapist for help if:
- You frequently lose your balance.
- You have fallen recently.
- You are unsure which hand should hold the cane.
- You cannot determine the correct cane height.
- Walking with the cane causes new or increased pain.
- You need to put substantial weight through the cane.
- You have difficulty managing stairs.
- You are unsure whether a cane provides enough support.
A short assessment can sometimes make a significant difference in how confidently and safely you use a mobility aid.
Frequently Asked Questions
How high should a cane be?
The cane handle should generally be around the crease of your wrist when you stand upright with your arm relaxed at your side. When holding the handle, your elbow should have a slight bend.
Which hand should hold a cane for arthritis?
For many people, the cane is held in the hand opposite the weaker or more painful leg. For example, a cane is generally held in the left hand when the right leg is the weaker or more painful side.
Should the cane be on the same side as the painful leg?
Usually, no. A cane is commonly used on the side opposite the painful or weaker leg. However, individual circumstances can vary, so professional guidance may be appropriate if you have significant mobility or balance problems.
Should you use a cane on stairs?
A cane can be used on stairs, but stairs require additional caution. Use a secure handrail whenever possible and take one step at a time if needed.
Is a cane supposed to touch the ground at the same time as your foot?
The timing depends on your walking pattern. A common technique is to move the cane forward with or just before the weaker or painful leg, followed by the stronger leg.
Can a cane help with arthritis pain?
A cane may reduce the amount of load placed through a painful or weaker leg and can provide additional stability while walking. It does not treat the underlying arthritis.
How do I know if a cane is not enough support?
If you frequently lose your balance, fall, cannot walk safely without putting substantial weight through the cane, or feel unstable even when using it correctly, you may need a mobility aid that provides more support.
Final Thoughts
A cane can be a useful mobility aid when it is properly adjusted and used correctly.
Start with the basics: set the correct height, use the appropriate hand, keep the cane close to your body, and take controlled steps. Pay particular attention when using a cane on stairs, curbs, uneven ground, or slippery surfaces.
Most importantly, don’t assume that a cane is the right mobility aid simply because it is convenient. If you need substantial support to walk safely, a physical therapist or other qualified healthcare professional can help determine whether a walker or another mobility aid would be more appropriate.
Related Reading
Best Walking Canes for Arthritis: Stability, Comfort & Support
Compare folding, freestanding, and stair canes and find the features that may matter most for different situations.
Arthritis Fall Prevention: Practical Ways to Reduce Your Risk
Practical strategies for making everyday movement and your home environment safer.
How to Choose Arthritis Assistive Devices
A broader guide to choosing tools and mobility aids when arthritis makes everyday activities more difficult.
Medical Disclaimer: This article is for informational purposes only and does not constitute medical advice. Always consult your doctor, rheumatologist, or occupational therapist before making changes to how you manage your arthritis.
